- WHEN? THURSDAY 2-3:30 PM
- AFTER? Submit test –> Short Break –> Return at 3:50 PM (Class Continues)
Your blog can be used.
Test format
- C# Quiz (Google Form)
- Unity Tasks (follow instructions, show project running + submit)
C Learnings So Far: Syntax, Comments, Variables, Data types, Operators, If-else, Arrays, Methods
Unity: You should be able to make your own variable and display them on Unity Editor! Your own methods! Connect your editor and script!
C# Syntax

Example explained
Line 1: using System means that we can use classes from the System namespace.
Line 2: A blank line. C# ignores white space. However, multiple lines makes the code more readable.
Line 3: namespace is used to organize your code, and it is a container for classes and other namespaces.
Line 4: The curly braces {} marks the beginning and the end of a block of code.
Line 5: class is a container for data and methods, which brings functionality to your program. Every line of code that runs in C# must be inside a class. In our example, we named the class Program.
Don’t worry if you don’t understand how using System, namespace and class works. Just think of it as something that (almost) always appears in your program, and that you will learn more about them in a later chapter.
Line 7: Another thing that always appear in a C# program is the Main method. Any code inside its curly brackets {} will be executed. You don’t have to understand the keywords before and after Main. You will get to know them bit by bit while reading this tutorial.
Line 9: Console is a class of the System namespace, which has a WriteLine() method that is used to output/print text. In our example, it will output “Hello World!”.
If you omit the using System line, you would have to write System.Console.WriteLine() to print/output text.
What is the role of the Main method in a C# program?
- To serve as the entry point where the program starts execution.
Note: Every C# statement ends with a semicolon ;.
Note: C# is case-sensitive; “MyClass” and “myclass” have different meaning.
Note: Unlike Java, the name of the C# file does not have to match the class name, but they often do (for better organization). When saving the file, save it using a proper name and add “.cs” to the end of the filename. To run the example above on your computer, make sure that C# is properly installed: Go to the Get Started Chapter for how to install C#. The output should be: Hello World!

NOTE: Regular C# and C# used in Unity can sometimes be different:


C# Comments
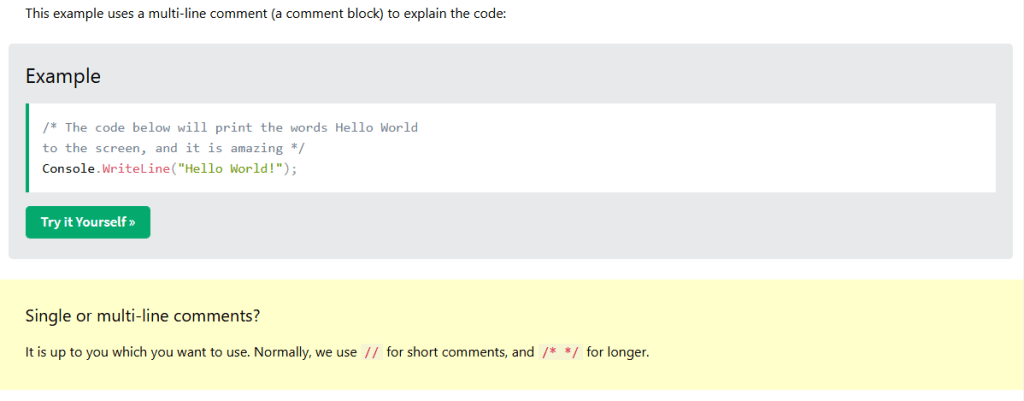
Comments can be used to explain C# code, and to make it more readable. It can also be used to prevent execution when testing alternative code.
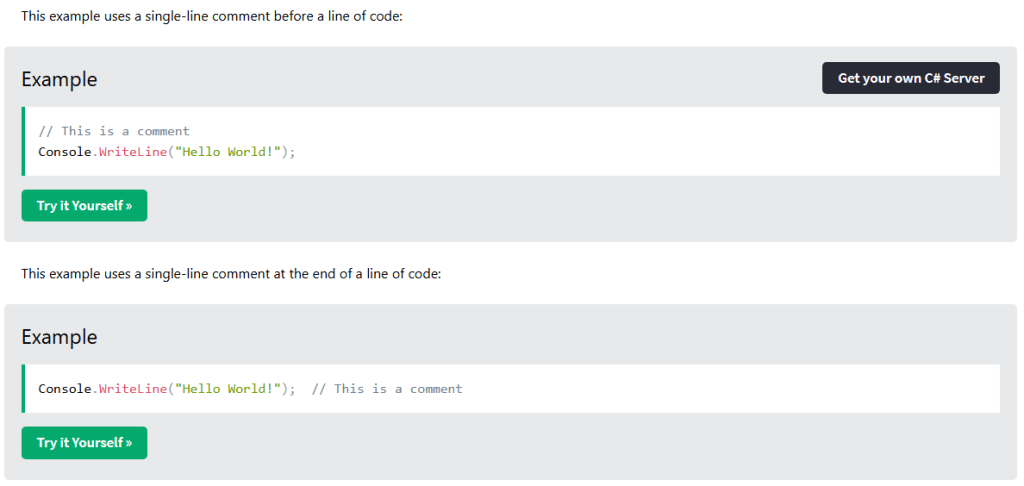
Single-line Comments
Single-line comments start with two forward slashes (//).
Any text between // and the end of the line is ignored by C# (will not be executed).
C# Multi-line Comments
Multi-line comments start with /* and ends with */.
Any text between /* and */ will be ignored by C#.
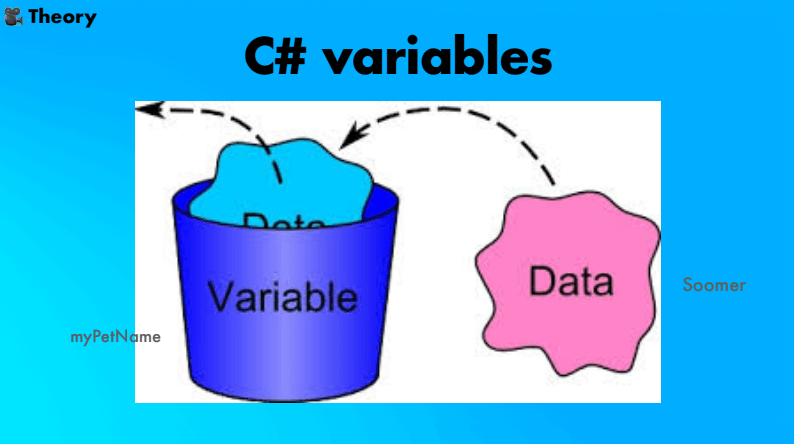
C# Variables
Variables are containers for storing data values.
In C#, there are different types of variables (defined with different keywords), for example:
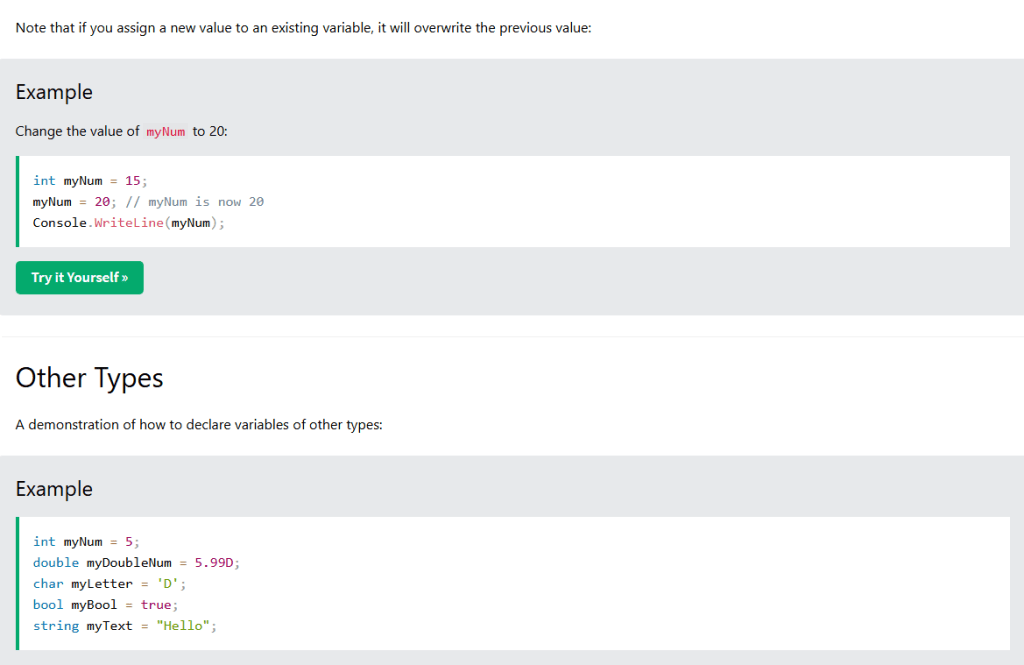
int– stores integers (whole numbers), without decimals, such as 123 or -123double– stores floating point numbers, with decimals, such as 19.99 or -19.99char– stores single characters, such as ‘a’ or ‘B’. Char values are surrounded by single quotesstring– stores text, such as “Hello World”. String values are surrounded by double quotesbool– stores values with two states: true or false


Constants (Sub Section for Variables)
If you don’t want others (or yourself) to overwrite existing values, you can add the const keyword in front of the variable type.

What does the const keyword in C# do? –> Declares a variable that is read-only and unchangeable.
Display Variables (Sub Section for Variables)
The WriteLine() method is often used to display variable values to the console window.
To combine both text and a variable, use the + character:

C# Multiple Variables (Sub Section for Variables)
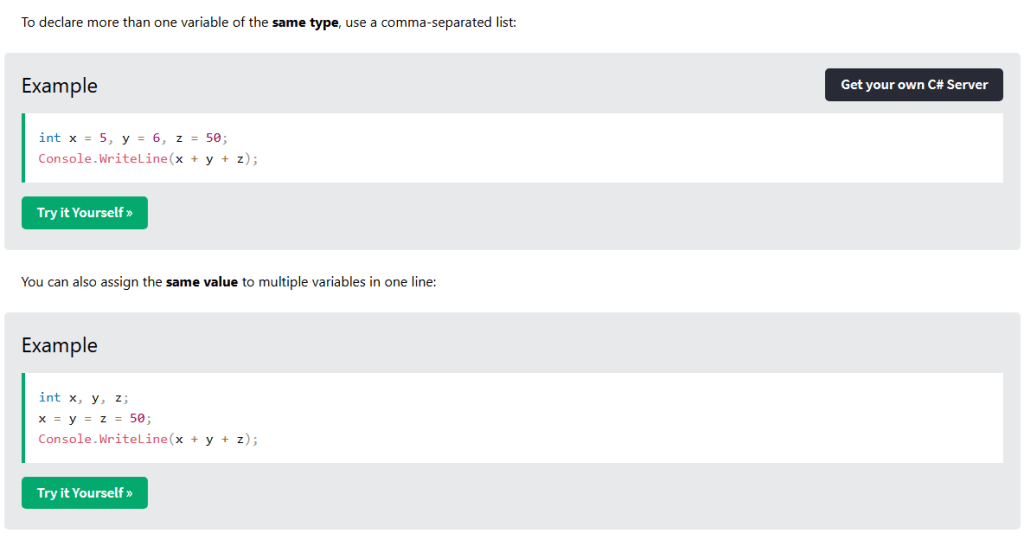
Declare Many Variables
C# Identifiers (Sub Section for Variables)
All C# variables must be identified with unique names.
These unique names are called identifiers.
Identifiers can be short names (like x and y) or more descriptive names (age, sum, totalVolume).
Note: It is recommended to use descriptive names in order to create understandable and maintainable code:
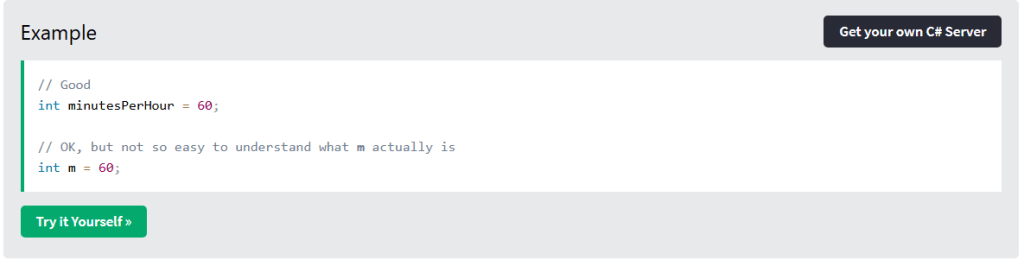
The general rules for naming variables are:
- Names can contain letters, digits and the underscore character (_)
- Names must begin with a letter or underscore
- Names should start with a lowercase letter, and cannot contain whitespace
- Names are case-sensitive (“myVar” and “myvar” are different variables)
- Reserved words (like C# keywords, such as
intordouble) cannot be used as names
C# Data Types
As explained in the variables chapter, a variable in C# must be a specified data type:
Example:
int myNum = 5;               // Integer (whole number)
double myDoubleNum = 5.99D;  // Floating point number
char myLetter = 'D';         // Character
bool myBool = true;          // Boolean
string myText = "Hello";     // String

A data type specifies the size and type of variable values.

It is important to use the correct data type for the corresponding variable; to avoid errors, to save time and memory, but it will also make your code more maintainable and readable. The most common data types are:

Numbers
Number types are divided into two groups:
Integer types stores whole numbers, positive or negative (such as 123 or -456), without decimals. Valid types are int and long. Which type you should use, depends on the numeric value.
Floating point types represents numbers with a fractional part, containing one or more decimals. Valid types are float and double.
Even though there are many numeric types in C#, the most used for numbers are int (for whole numbers) and double (for floating point numbers). However, we will describe them all as you continue to read.
Integer Types
Int
The int data type can store whole numbers from -2147483648 to 2147483647. In general, and in our tutorial, the int data type is the preferred data type when we create variables with a numeric value.
Example
int myNum = 100000;
Console.WriteLine(myNum);
Long
The long data type can store whole numbers from -9223372036854775808 to 9223372036854775807. This is used when int is not large enough to store the value. Note that you should end the value with an “L”:
Example
long myNum = 15000000000L;
Console.WriteLine(myNum);
Floating Point Types
You should use a floating point type whenever you need a number with a decimal, such as 9.99 or 3.14515.
The float and double data types can store fractional numbers. Note that you should end the value with an “F” for floats and “D” for doubles:
Float Example
float myNum = 5.75F;
Console.WriteLine(myNum);
Double Example
double myNum = 19.99D;
Console.WriteLine(myNum);
Use float or double?
The precision of a floating point value indicates how many digits the value can have after the decimal point. The precision of float is only six or seven decimal digits, while double variables have a precision of about 15 digits. Therefore it is safer to use double for most calculations.
Scientific Numbers
A floating point number can also be a scientific number with an “e” to indicate the power of 10:
Example
float f1 = 35e3F;
double d1 = 12E4D;
Console.WriteLine(f1);
Console.WriteLine(d1);
Booleans
A boolean data type is declared with the bool keyword and can only take the values true or false:
Example
bool isCSharpFun = true;
bool isFishTasty = false;
Console.WriteLine(isCSharpFun);   // Outputs True
Console.WriteLine(isFishTasty);   // Outputs False
Boolean values are mostly used for conditional testing, which you will learn more about in a later chapter.
Characters
The char data type is used to store a single character. The character must be surrounded by single quotes, like ‘A’ or ‘c’:
Example
char myGrade = 'B';
Console.WriteLine(myGrade);
Strings
The string data type is used to store a sequence of characters (text). String values must be surrounded by double quotes:
Example
string greeting = "Hello World";
Console.WriteLine(greeting);


Operators
Operators are used to perform operations on variables and values.
In the example below, we use the + operator to add together two values:
Example
int x = 100 + 50;
Although the + operator is often used to add together two values, like in the example above, it can also be used to add together a variable and a value, or a variable and another variable:
Example
int sum1 = 100 + 50;        // 150 (100 + 50)
int sum2 = sum1 + 250;      // 400 (150 + 250)
int sum3 = sum2 + sum2;     // 800 (400 + 400)
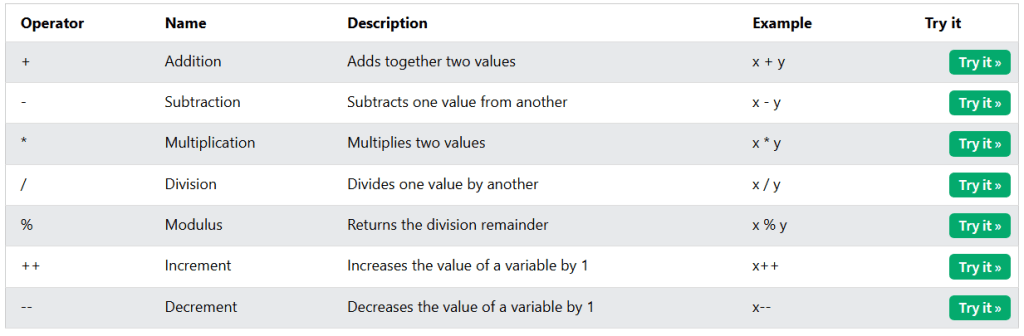
Arithmetic Operators
Arithmetic operators are used to perform common mathematical operations:
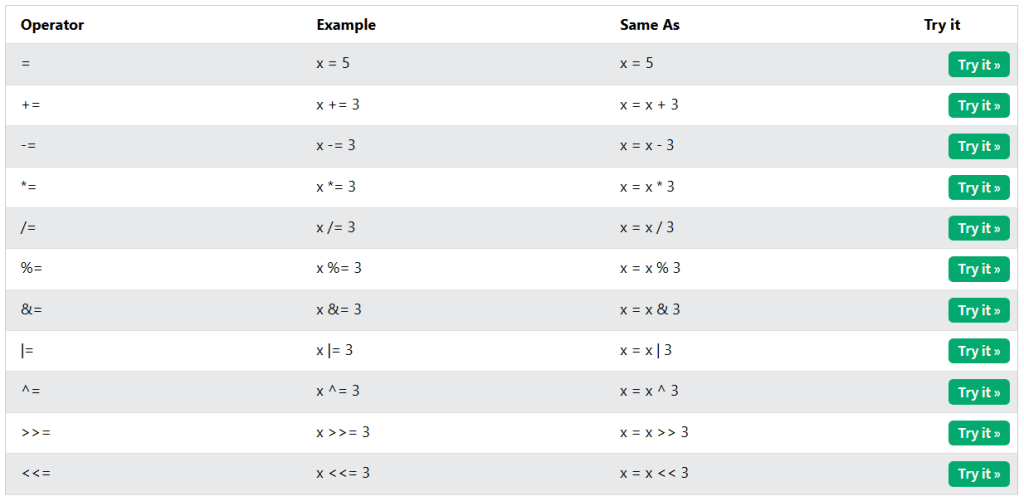
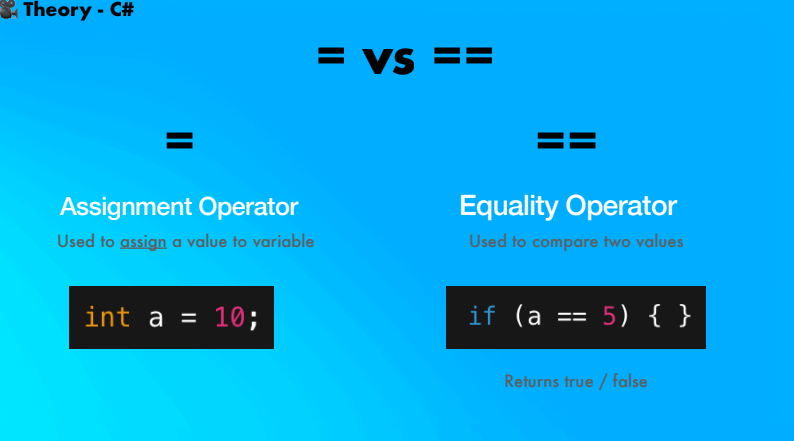
Assignment Operators
Assignment operators are used to assign values to variables.
In the example below, we use the assignment operator (=) to assign the value 10 to a variable called x:
Example
int x = 10;
The addition assignment operator (+=) adds a value to a variable:
Example
int x = 10;
x += 5;
A list of all assignment operators:
Comparison Operators
Comparison operators are used to compare two values (or variables). This is important in programming, because it helps us to find answers and make decisions.
The return value of a comparison is either True or False. These values are known as Boolean values, and you will learn more about them in the Booleans and If..Else chapter.
In the following example, we use the greater than operator (>) to find out if 5 is greater than 3:
Example
int x = 5;
int y = 3;
Console.WriteLine(x > y); // returns True because 5 is greater than 3
A list of all comparison operators:

Logical Operators
As with comparison operators, you can also test for True or False values with logical operators.
Logical operators are used to determine the logic between variables or values:

You will learn more about comparison and logical operators in the Booleans and If…Else chapters.

C# Conditions and If Statements
You already know that C# supports familiar comparison conditions from mathematics, such as:
- Less than: a < b
- Less than or equal to: a <= b
- Greater than: a > b
- Greater than or equal to: a >= b
- Equal to a == b
- Not Equal to: a != b
You can use these conditions to perform different actions for different decisions.
C# has the following conditional statements:
- Use
ifto specify a block of code to be executed, if a specified condition is true - Use
elseto specify a block of code to be executed, if the same condition is false - Use
else ifto specify a new condition to test, if the first condition is false - Use
switchto specify many alternative blocks of code to be executed
The if Statement
Use the if statement to specify a block of C# code to be executed if a condition is True.
Syntax
if (condition)
{
  // block of code to be executed if the condition is True
}

Note that if is in lowercase letters. Uppercase letters (If or IF) will generate an error.

In the example below, we test two values to find out if 20 is greater than 18. If the condition is True, print some text:

Example
if (20 > 18)
{
  Console.WriteLine("20 is greater than 18");
}

We can also test variables:

Example
int x = 20;
int y = 18;
if (x > y)
{
  Console.WriteLine("x is greater than y");
}
Example explained
In the example above we use two variables, x and y, to test whether x is greater than y (using the > operator). As x is 20, and y is 18, and we know that 20 is greater than 18, we print to the screen that “x is greater than y”.
The else Statement
Use the else statement to specify a block of code to be executed if the condition is False.
Syntax
if (condition)
{
  // block of code to be executed if the condition is True
}
else
{
  // block of code to be executed if the condition is False
}
Example
int time = 20;
if (time < 18)
{
  Console.WriteLine("Good day.");
}
else
{
  Console.WriteLine("Good evening.");
}
// Outputs "Good evening."
Example explained
In the example above, time (20) is greater than 18, so the condition is False. Because of this, we move on to the else condition and print to the screen “Good evening”. If the time was less than 18, the program would print “Good day”.
The else if Statement
Use the else if statement to specify a new condition if the first condition is False.
Syntax
if (condition1)
{
  // block of code to be executed if condition1 is True
}
else if (condition2)
{
  // block of code to be executed if the condition1 is false and condition2 is True
}
else
{
  // block of code to be executed if the condition1 is false and condition2 is False
}
Example
int time = 22;
if (time < 10)
{
  Console.WriteLine("Good morning.");
}
else if (time < 20)
{
  Console.WriteLine("Good day.");
}
else
{
  Console.WriteLine("Good evening.");
}
// Outputs "Good evening."
Example explained
In the example above, time (22) is greater than 10, so the first condition is False. The next condition, in the else if statement, is also False, so we move on to the else condition since condition1 and condition2 is both False – and print to the screen “Good evening”.
However, if the time was 14, our program would print “Good day.”
Short Hand If…Else (Ternary Operator)
There is also a short-hand if else, which is known as the ternary operator because it consists of three operands. It can be used to replace multiple lines of code with a single line. It is often used to replace simple if else statements:
Syntax
variable = (condition) ? expressionTrue : expressionFalse;Instead of writing:
Example
int time = 20;
if (time < 18)
{
  Console.WriteLine("Good day.");
}
else
{
  Console.WriteLine("Good evening.");
}
You can simply write:
Example
int time = 20;
string result = (time < 18) ? "Good day." : "Good evening.";
Console.WriteLine(result);
C# Arrays
Create an Array
Arrays are used to store multiple values in a single variable, instead of declaring separate variables for each value.
To declare an array, define the variable type with square brackets:
string[] cars;
We have now declared a variable that holds an array of strings.
To insert values to it, we can use an array literal – place the values in a comma-separated list, inside curly braces:
string[] cars = {"Volvo", "BMW", "Ford", "Mazda"};
To create an array of integers, you could write:
int[] myNum = {10, 20, 30, 40};
Access the Elements of an Array
You access an array element by referring to the index number.
This statement accesses the value of the first element in cars:
Example
string[] cars = {"Volvo", "BMW", "Ford", "Mazda"};
Console.WriteLine(cars[0]);
// Outputs Volvo
Note: Array indexes start with 0: [0] is the first element. [1] is the second element, etc.
Change an Array Element
To change the value of a specific element, refer to the index number:
Example
cars[0] = "Opel";
Example
string[] cars = {"Volvo", "BMW", "Ford", "Mazda"};
cars[0] = "Opel";
Console.WriteLine(cars[0]);
// Now outputs Opel instead of Volvo
Array Length
To find out how many elements an array has, use the Length property:
Example
string[] cars = {"Volvo", "BMW", "Ford", "Mazda"};
Console.WriteLine(cars.Length);
// Outputs 4
Other Ways to Create an Array
If you are familiar with C#, you might have seen arrays created with the new keyword, and perhaps you have seen arrays with a specified size as well. In C#, there are different ways to create an array:
// Create an array of four elements, and add values later
string[] cars = new string[4];

// Create an array of four elements and add values right away
string[] cars = new string[4] {"Volvo", "BMW", "Ford", "Mazda"};

// Create an array of four elements without specifying the size
string[] cars = new string[] {"Volvo", "BMW", "Ford", "Mazda"};

// Create an array of four elements, omitting the new keyword, and without specifying the size
string[] cars = {"Volvo", "BMW", "Ford", "Mazda"};
It is up to you which option you choose. In our tutorial, we will often use the last option, as it is faster and easier to read.
However, you should note that if you declare an array and initialize it later, you have to use the new keyword:
// Declare an array
string[] cars;

// Add values, using new
cars = new string[] {"Volvo", "BMW", "Ford"};

// Add values without using new (this will cause an error)
cars ={"Volvo","BMW","Ford"};
Sort an Array
There are many array methods available, for example Sort(), which sorts an array alphabetically or in an ascending order:
Example
// Sort a string
string[] cars = {"Volvo", "BMW", "Ford", "Mazda"};
Array.Sort(cars);
foreach (string i in cars)
{
  Console.WriteLine(i);
}
// Sort an int
int[] myNumbers = {5, 1, 8, 9};
Array.Sort(myNumbers);
foreach (int i in myNumbers)
{
  Console.WriteLine(i);
}
System.Linq Namespace
Other useful array methods, such as Min, Max, and Sum, can be found in the System.Linq namespace:
Example
using System;
using System.Linq;

namespace MyApplication
{
  class Program
  {
    static void Main(string[] args)
    {
      int[] myNumbers = {5, 1, 8, 9};
      Console.WriteLine(myNumbers.Max());  // returns the largest value
      Console.WriteLine(myNumbers.Min());  // returns the smallest value
      Console.WriteLine(myNumbers.Sum());  // returns the sum of elements
    }
  }
}
You will learn more about other namespaces in a later chapter.
Multidimensional Arrays
In the previous chapter, you learned about arrays, which is also known as single dimension arrays. These are great, and something you will use a lot while programming in C#. However, if you want to store data as a tabular form, like a table with rows and columns, you need to get familiar with multidimensional arrays.
A multidimensional array is basically an array of arrays.
Arrays can have any number of dimensions. The most common are two-dimensional arrays (2D).
Two-Dimensional Arrays
To create a 2D array, add each array within its own set of curly braces, and insert a comma (,) inside the square brackets:
Example
int[,] numbers = { {1, 4, 2}, {3, 6, 8} };
Good to know: The single comma [,] specifies that the array is two-dimensional. A three-dimensional array would have two commas: int[,,].
numbers is now an array with two arrays as its elements. The first array element contains three elements: 1, 4 and 2, while the second array element contains 3, 6 and 8. To visualize it, think of the array as a table with rows and columns:
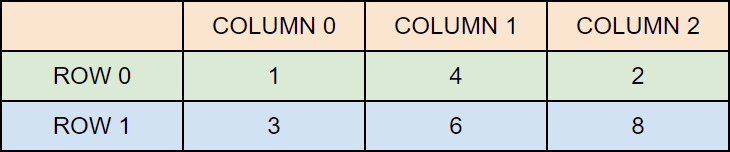
Access Elements of a 2D Array
To access an element of a two-dimensional array, you must specify two indexes: one for the array, and one for the element inside that array. Or better yet, with the table visualization in mind; one for the row and one for the column (see example below).
This statement accesses the value of the element in the first row (0) and third column (2) of the numbers array:
Example
int[,] numbers = { {1, 4, 2}, {3, 6, 8} };
Console.WriteLine(numbers[0, 2]);  // Outputs 2
Remember that: Array indexes start with 0: [0] is the first element. [1] is the second element, etc.
Change Elements of a 2D Array
You can also change the value of an element.
The following example will change the value of the element in the first row (0) and first column (0):
Example
int[,] numbers = { {1, 4, 2}, {3, 6, 8} };
numbers[0, 0] = 5;  // Change value to 5
Console.WriteLine(numbers[0, 0]); // Outputs 5 instead of 1
C# Methods
A method is a block of code which only runs when it is called.
You can pass data, known as parameters, into a method.
Methods are used to perform certain actions, and they are also known as functions.
Why use methods? To reuse code: define the code once, and use it many times.
Create a Method
A method is defined with the name of the method, followed by parentheses (). C# provides some pre-defined methods, which you already are familiar with, such as Main(), but you can also create your own methods to perform certain actions:
Example
Create a method inside the Program class:
class Program
{
  static void MyMethod()
  {
    // code to be executed
  }
}
Example Explained
MyMethod()is the name of the methodstaticmeans that the method belongs to the Program class and not an object of the Program class. You will learn more about objects and how to access methods through objects later in this tutorial.voidmeans that this method does not have a return value. You will learn more about return values later in this chapter
Note: In C#, it is good practice to start with an uppercase letter when naming methods, as it makes the code easier to read.
Call a Method
To call (execute) a method, write the method’s name followed by two parentheses () and a semicolon;
In the following example, MyMethod() is used to print a text (the action), when it is called:
Example
Inside Main(), call the myMethod() method:
static void MyMethod()
{
  Console.WriteLine("I just got executed!");
}

static void Main(string[] args)
{
  MyMethod();
}

// Outputs "I just got executed!"
A method can be called multiple times:
Example
static void MyMethod()
{
  Console.WriteLine("I just got executed!");
}

static void Main(string[] args)
{
  MyMethod();
  MyMethod();
  MyMethod();
}

// I just got executed!
// I just got executed!
// I just got executed!

Parameters and Arguments
Information can be passed to methods as parameter. Parameters act as variables inside the method.
They are specified after the method name, inside the parentheses. You can add as many parameters as you want, just separate them with a comma.
The following example has a method that takes a string called fname as parameter. When the method is called, we pass along a first name, which is used inside the method to print the full name:
Example
static void MyMethod(string fname)
{
  Console.WriteLine(fname + " Refsnes");
}

static void Main(string[] args)
{
  MyMethod("Liam");
  MyMethod("Jenny");
  MyMethod("Anja");
}

// Liam Refsnes
// Jenny Refsnes
// Anja Refsnes
When a parameter is passed to the method, it is called an argument. So, from the example above: fname is a parameter, while Liam, Jenny and Anja are arguments.

Multiple Parameters
You can have as many parameters as you like, just separate them with commas:
Example
static void MyMethod(string fname, int age)
{
  Console.WriteLine(fname + " is " + age);
}

static void Main(string[] args)
{
  MyMethod("Liam", 5);
  MyMethod("Jenny", 8);
  MyMethod("Anja", 31);
}

// Liam is 5
// Jenny is 8
// Anja is 31
Default Parameter Value
You can also use a default parameter value, by using the equals sign (=).
If we call the method without an argument, it uses the default value (“Norway”):
ExampleGet your own C# Server
static void MyMethod(string country = "Norway")
{
  Console.WriteLine(country);
}

static void Main(string[] args)
{
  MyMethod("Sweden");
  MyMethod("India");
  MyMethod();
  MyMethod("USA");
}

// Sweden
// India
// Norway
// USA
A parameter with a default value, is often known as an “optional parameter“. From the example above, country is an optional parameter and "Norway" is the default value.
Return Values
In the previous page, we used the void keyword in all examples, which indicates that the method should not return a value.
If you want the method to return a value, you can use a primitive data type (such as int or double) instead of void, and use the return keyword inside the method:
Example
static int MyMethod(int x)
{
  return 5 + x;
}

static void Main(string[] args)
{
  Console.WriteLine(MyMethod(3));
}

// Outputs 8 (5 + 3)
This example returns the sum of a method’s two parameters:
Example
static int MyMethod(int x, int y)
{
  return x + y;
}

static void Main(string[] args)
{
  Console.WriteLine(MyMethod(5, 3));
}

// Outputs 8 (5 + 3)
You can also store the result in a variable (recommended, as it is easier to read and maintain):
Example
static int MyMethod(int x, int y)
{
  return x + y;
}

static void Main(string[] args)
{
  int z = MyMethod(5, 3);
  Console.WriteLine(z);
}

// Outputs 8 (5 + 3)
Named Arguments
It is also possible to send arguments with the key: value syntax.
That way, the order of the arguments does not matter:
Example
static void MyMethod(string child1, string child2, string child3)
{
  Console.WriteLine("The youngest child is: " + child3);
}

static void Main(string[] args)
{
  MyMethod(child3: "John", child1: "Liam", child2: "Liam");
}

// The youngest child is: John
Method Overloading
With method overloading, multiple methods can have the same name with different parameters:
Example
int MyMethod(int x)
float MyMethod(float x)
double MyMethod(double x, double y)
Consider the following example, which has two methods that add numbers of different types:
Example
static int PlusMethodInt(int x, int y)
{
  return x + y;
}

static double PlusMethodDouble(double x, double y)
{
  return x + y;
}

static void Main(string[] args)
{
  int myNum1 = PlusMethodInt(8, 5);
  double myNum2 = PlusMethodDouble(4.3, 6.26);
  Console.WriteLine("Int: " + myNum1);
  Console.WriteLine("Double: " + myNum2);
}
Instead of defining two methods that should do the same thing, it is better to overload one.
In the example below, we overload the PlusMethod method to work for both int and double:
Example
static int PlusMethod(int x, int y)
{
  return x + y;
}

static double PlusMethod(double x, double y)
{
  return x + y;
}

static void Main(string[] args)
{
  int myNum1 = PlusMethod(8, 5);
  double myNum2 = PlusMethod(4.3, 6.26);
  Console.WriteLine("Int: " + myNum1);
  Console.WriteLine("Double: " + myNum2);
}
UNITY
Links provided by teacher:
https://learn.unity.com/course/beginner-scripting/tutorial/loops-z2b?version=2019.3
https://learn.unity.com/course/2d-beginner-adventure-game
Link to the class google drive:
https://drive.google.com/drive/folders/1U7CLraFShruGOjZ2oGjaQJ7b6ulDk4Kv
Unity: You should be able to make your own variable and display them on Unity Editor! Your own methods! Connect your editor and script!
UNITY TASKS (WHAT YOU ARE EXPECTED TO KNOW):

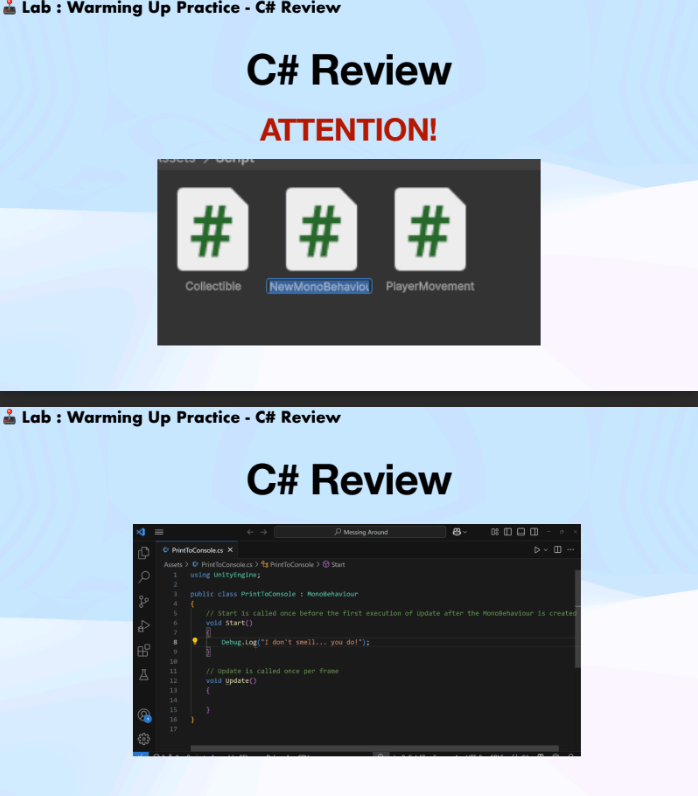
Review on Organising Scripts + Creating MonoBehaviour Script (REMINDER):


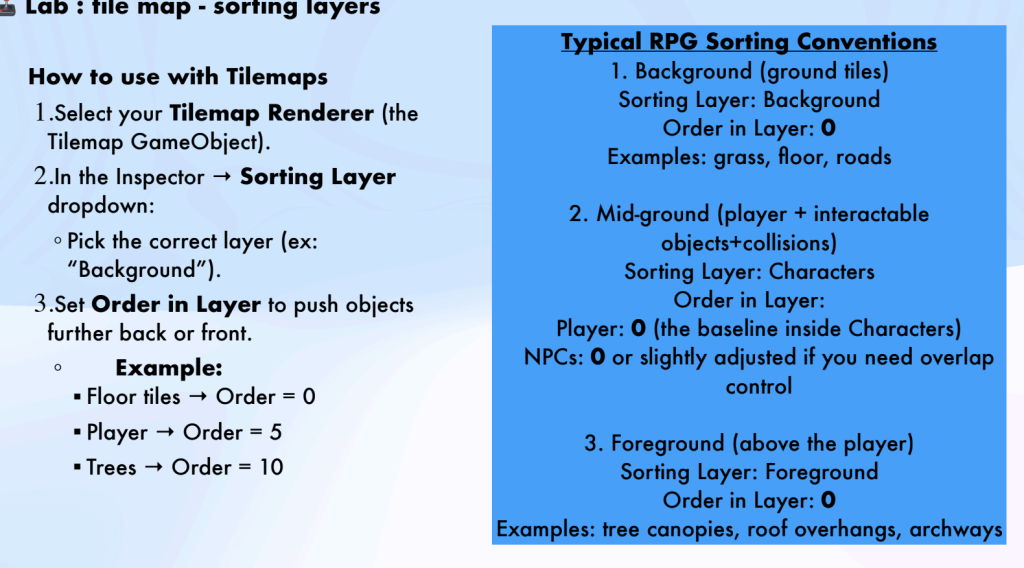
Tile Map (Can be found online or made, used for background of your game)


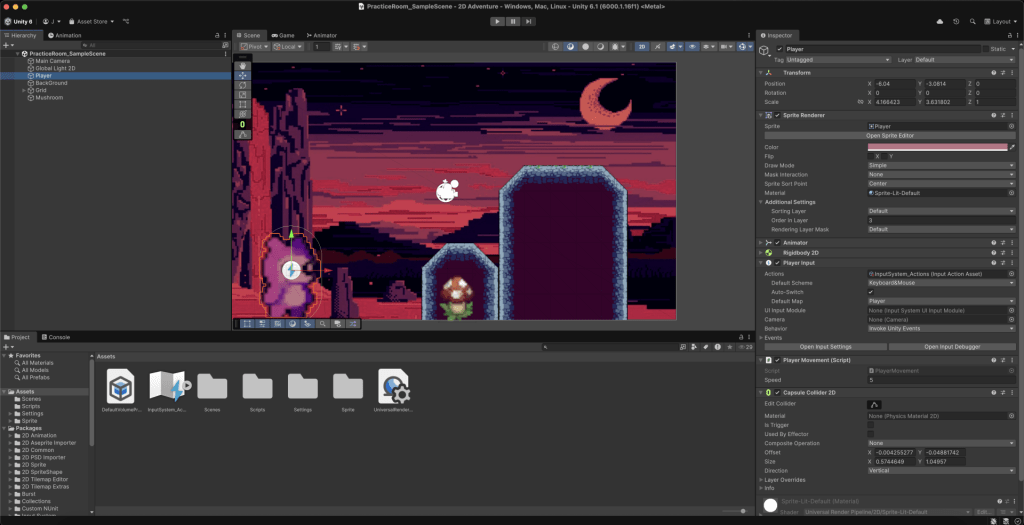
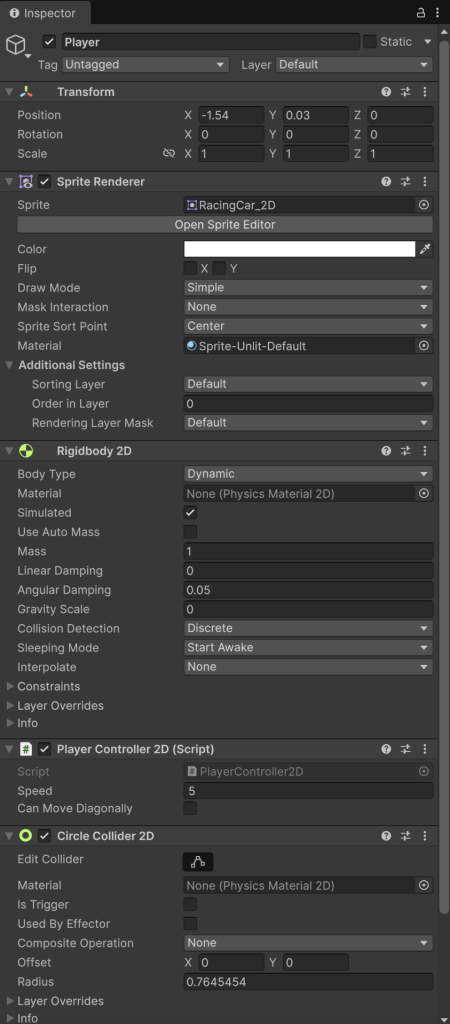
Player Set Up
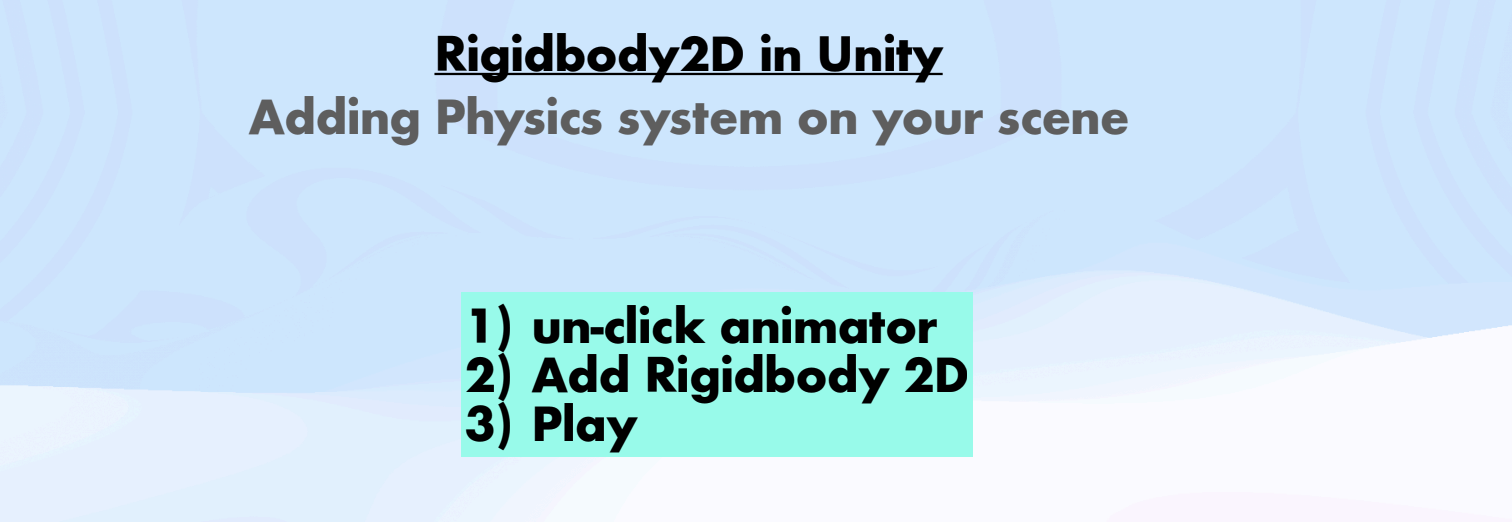
REMINDER:
Without changing its gravity, the player will fall through the scene.
How do I stop this then? :

Player Set Up – Input System


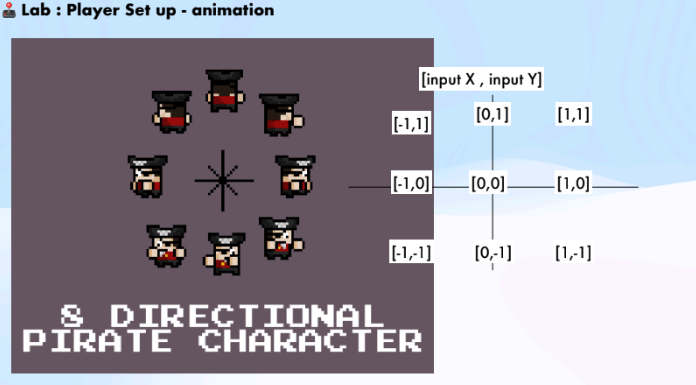
Player Set Up – Animation
Create left, right, up, down walking animation
- In our top-down RPG, you don’t always need 4 walking directions.
- Right now, we only have a Walk Right animation.
- We can flip the sprite in Unity (no Photoshop needed) to reuse it for Walk Left.
- For Up and Down, you can:
Reuse another animation (like Idle or Walk Right) as a placeholder,
OR
Create new artwork if you want more polish.
💡Tips: For your final project, it’s up to you how many directions you want to
include. Some games only use Left/Right, others use all 4 directions. Choose
based on your project’s needs.


Check Point :
- Animation Clips are all set (Jump, Idle, Walk)
- Blendtree on each State(Jump,Idle,Walk) are set
-transition are connected by using bool + trigger - we update our code for animation. (Final version is on Google Doc as well)
Now you have player move around with right animation!

Collider 2D


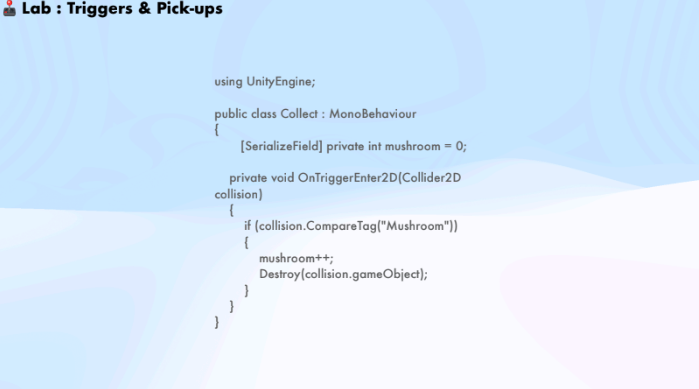
Triggers & Pick-ups
Unity Asset Store
Explore assets here: https://assetstore.unity.com/
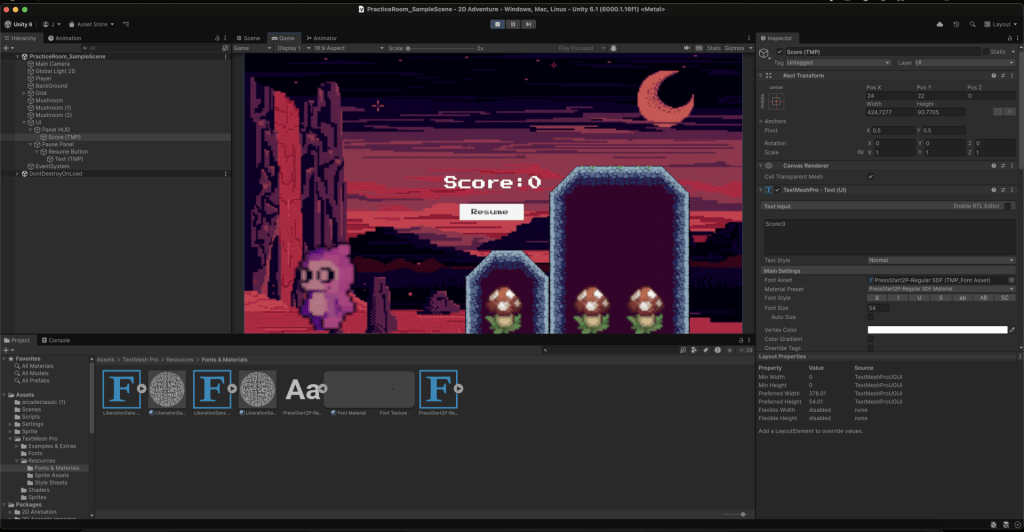
UI System


Basics to REMEMBER
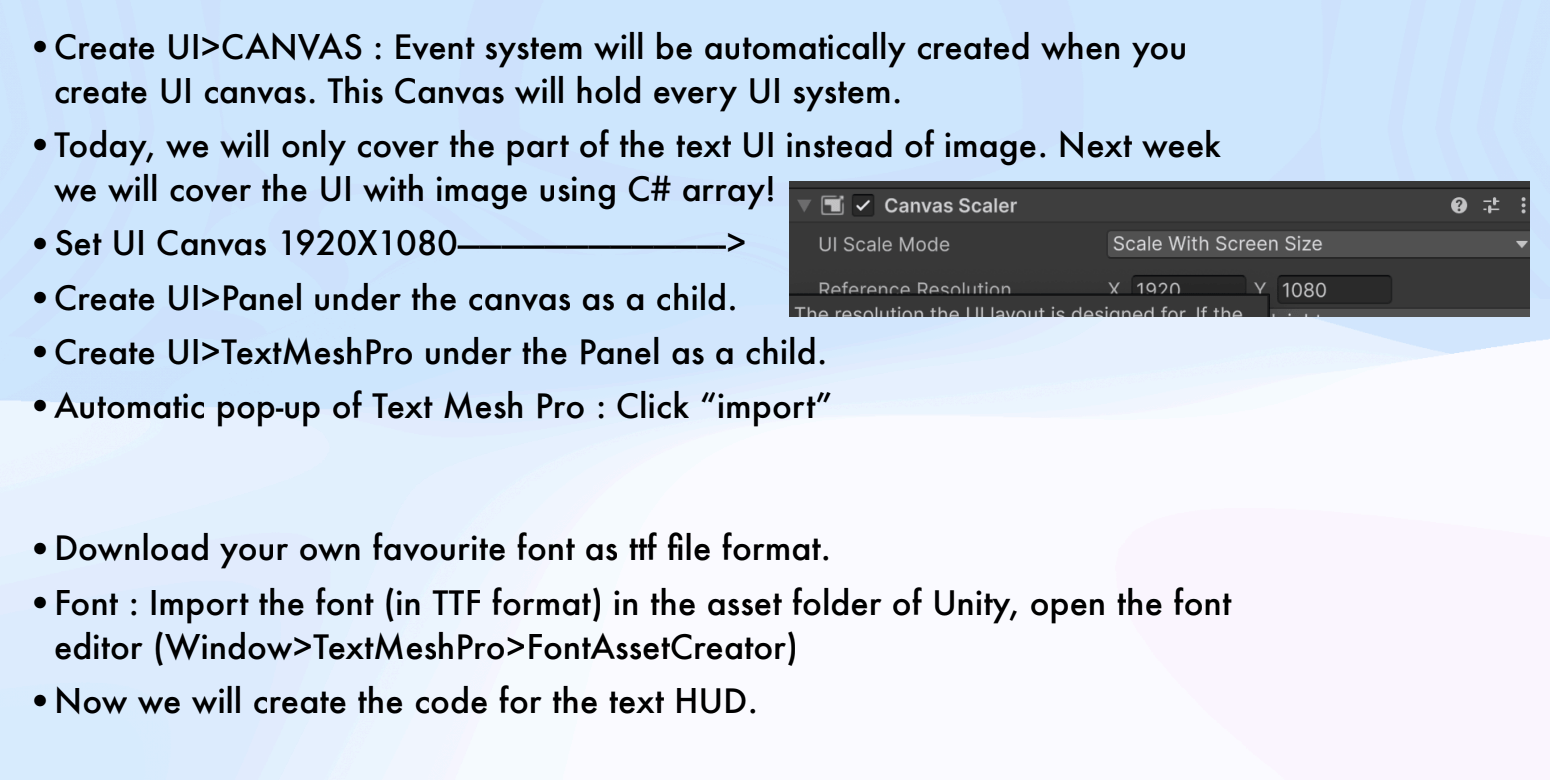
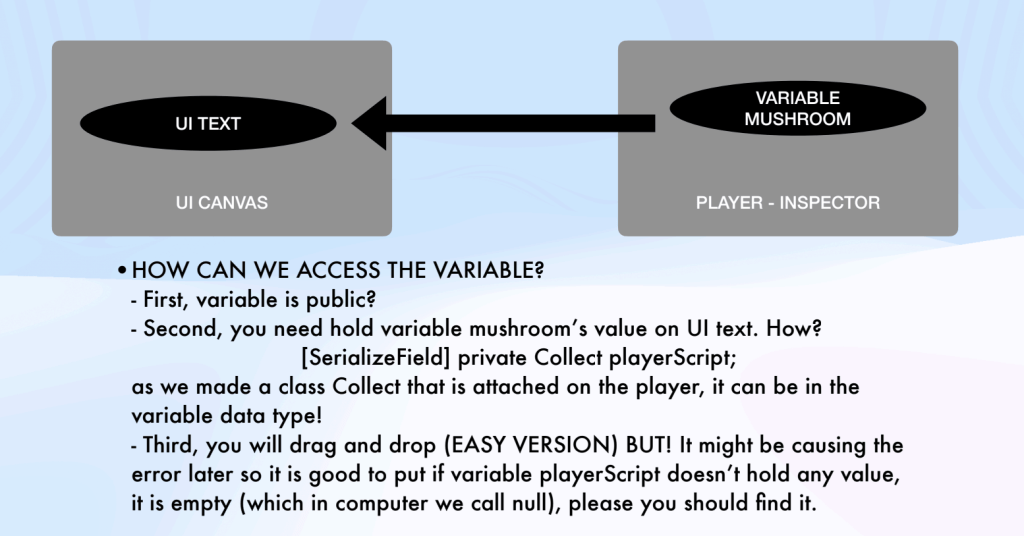
UI System – HUD (Text Only)

UI System – Creating Pause Button


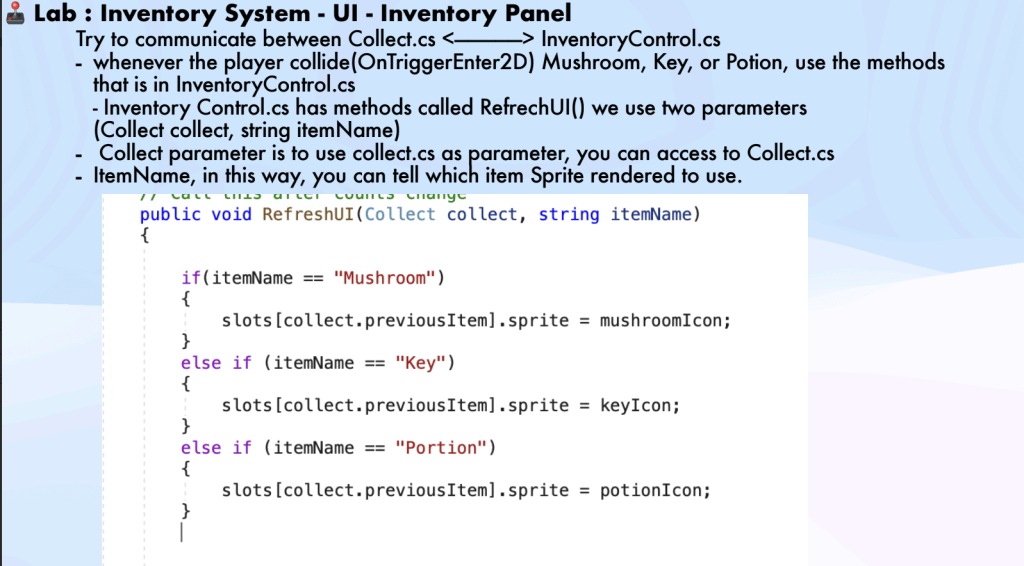
UI System – Inventory System

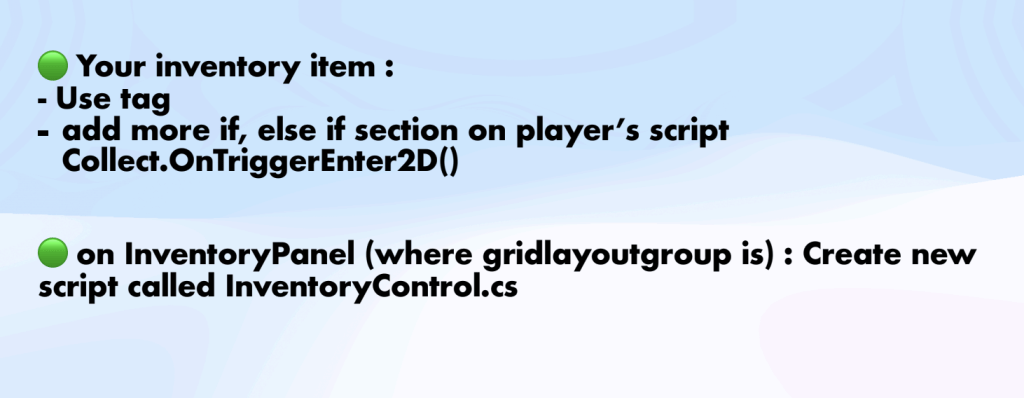

Scripts Used
COLLECT SCRIPT
using UnityEngine;
public class Collect : MonoBehaviour
{
public int mushroom = 0;
[SerializeField] InventoryControl inventoryScript;
// Start is called once before the first execution of Update after the MonoBehaviour is created
void Start()
{
}
// Update is called once per frame
void Update()
{
}
private void OnTriggerEnter2D(Collider2D col)
{
if (col.CompareTag("Mushroom"))
{
inventoryScript.RefreshUI();
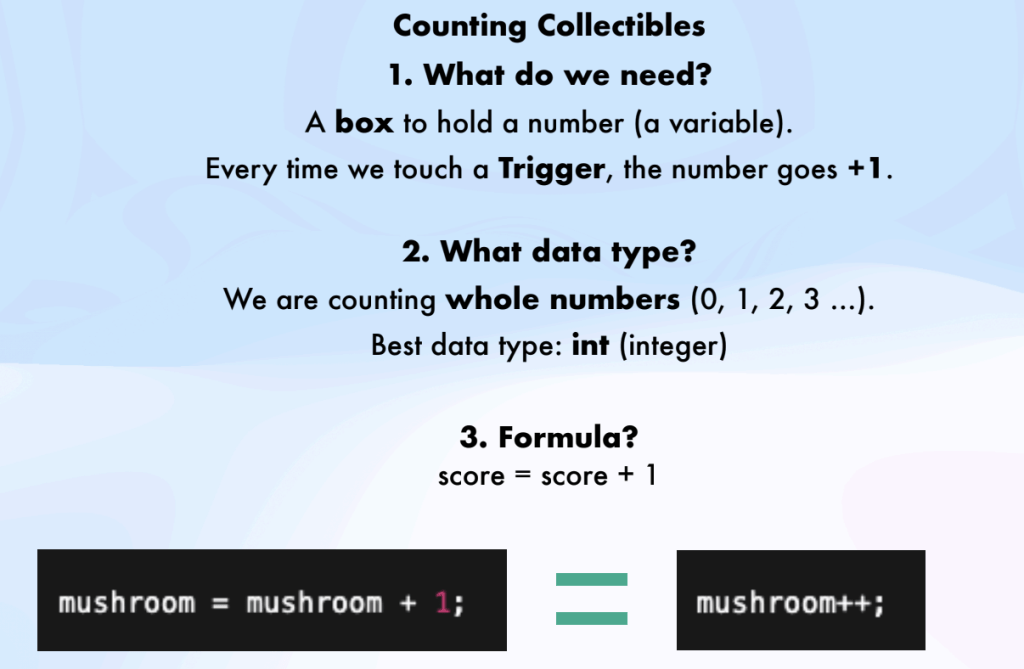
mushroom++;
Destroy(col.gameObject);
}
}
}

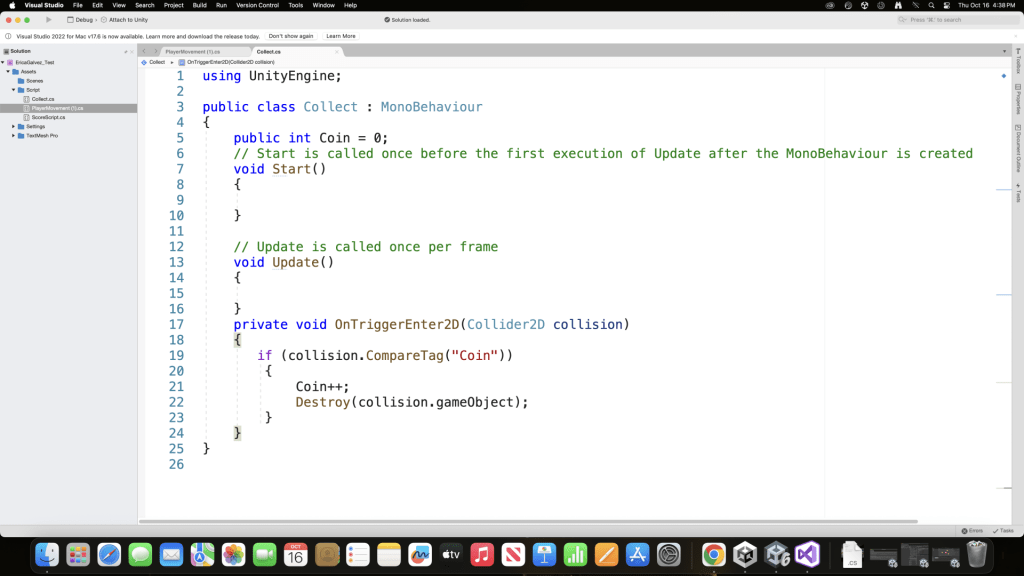
Collect Script (Provided on Google Docs by Teacher)
using UnityEngine;

public class Collect : MonoBehaviour
{
    // Start is called once before the first execution of Update after the MonoBehaviour is created
    public int mushroom = 0;

    private void OnTriggerEnter2D(Collider2D collision)
    {
        if (collision.CompareTag("Mushroom"))
        {
            mushroom++;
            Destroy(collision.gameObject);
        }
    }
}
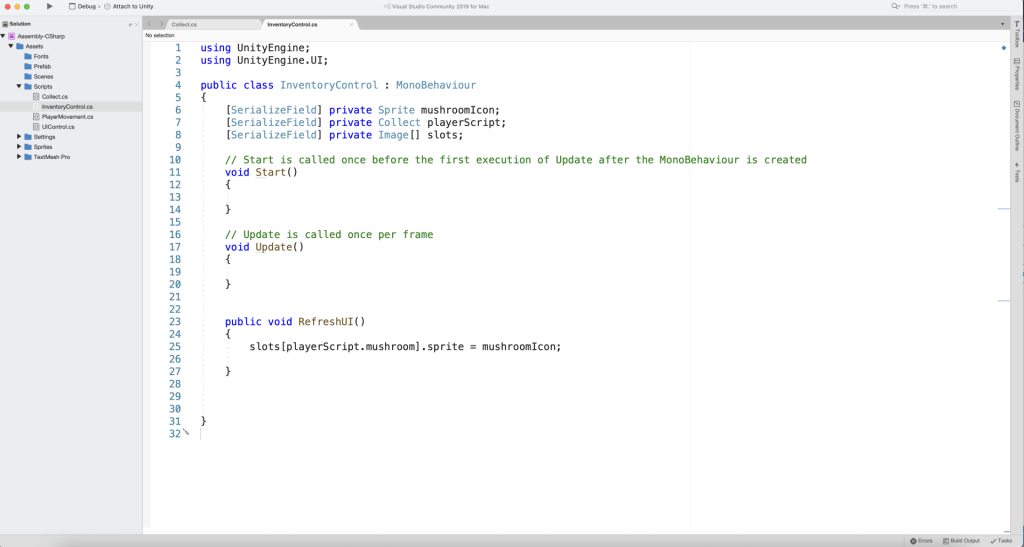
Inventory Control Script
using UnityEngine;
using UnityEngine.UI;
public class InventoryControl : MonoBehaviour
{
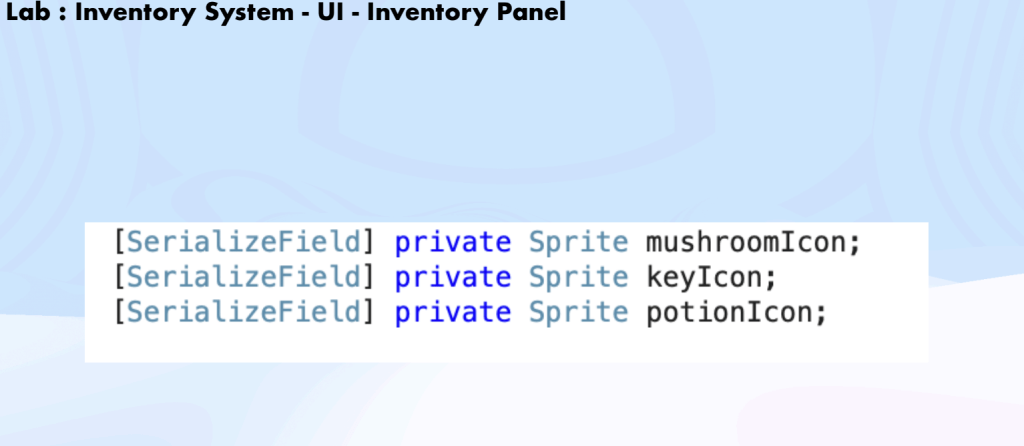
[SerializeField] private Sprite mushroomIcon;
[SerializeField] private Collect playerScript;
[SerializeField] private Image[] slots;
// Start is called once before the first execution of Update after the MonoBehaviour is created
void Start()
{
}
// Update is called once per frame
void Update()
{
}
public void RefreshUI()
{
slots[playerScript.mushroom].sprite = mushroomIcon;
}
}
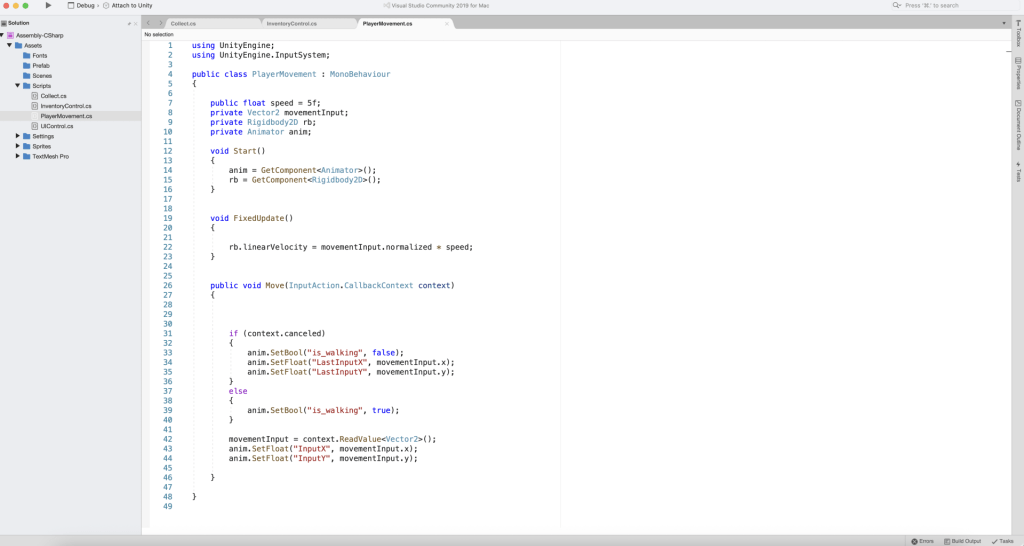
Player Movement Script
using UnityEngine;
using UnityEngine.InputSystem;

public class PlayerMovement : MonoBehaviour
{

    public float speed = 5f;
    private Vector2 movementInput;
    private Rigidbody2D rb;
    private Animator anim;

    void Start()
    {
        anim = GetComponent<Animator>();
        rb = GetComponent<Rigidbody2D>();
    }


    void FixedUpdate()
    {

        rb.linearVelocity = movementInput.normalized * speed;
    }


    public void Move(InputAction.CallbackContext context)
    {


        if (context.canceled)
        {
            anim.SetBool("is_walking", false);
            anim.SetFloat("LastInputX", movementInput.x);
            anim.SetFloat("LastInputY", movementInput.y);
        }
        else
        {
            anim.SetBool("is_walking", true);
        }

        movementInput = context.ReadValue<Vector2>();
        anim.SetFloat("InputX", movementInput.x);
        anim.SetFloat("InputY", movementInput.y);

    }

}
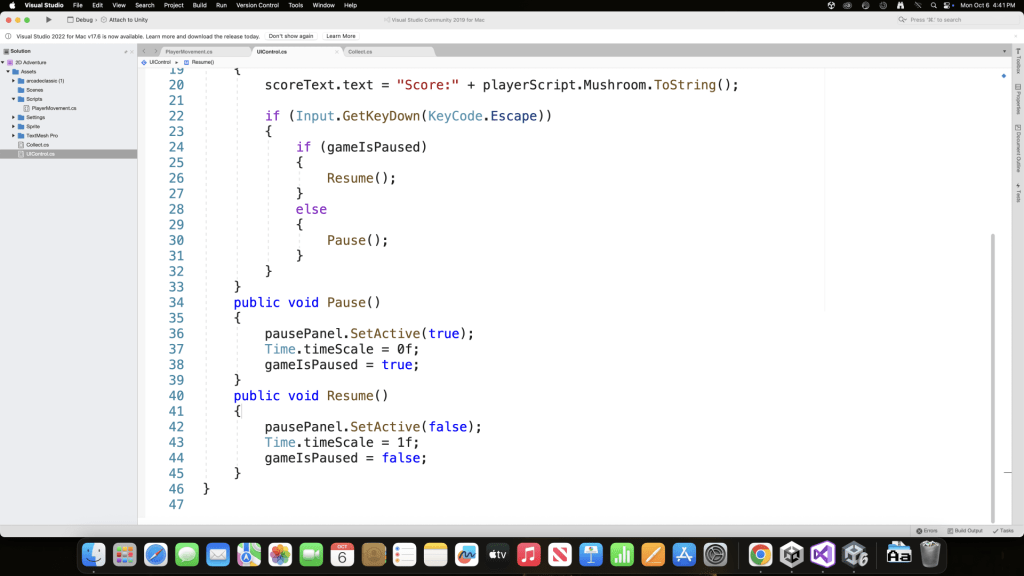
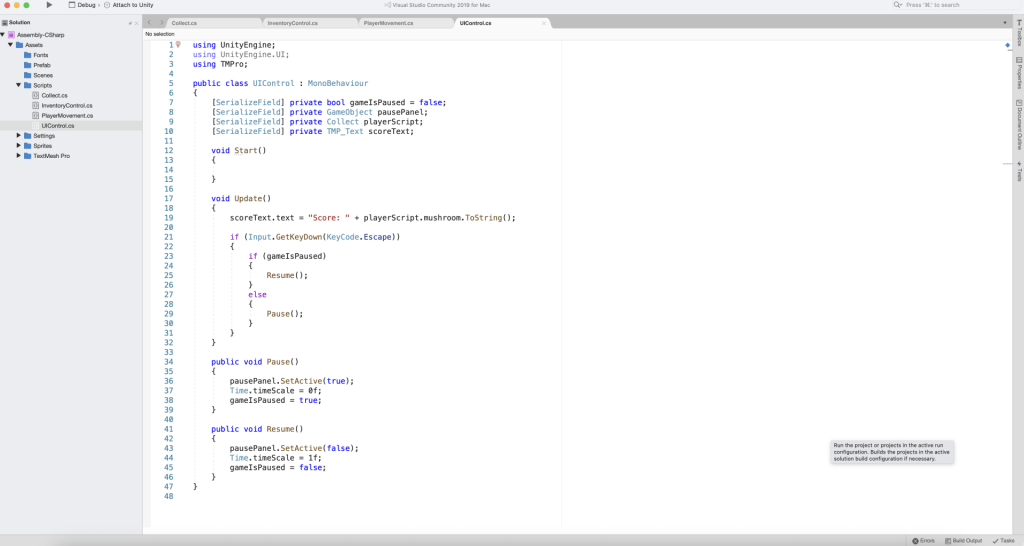
UI Control Script
using UnityEngine;
using UnityEngine.UI;
using TMPro;

public class UIControl : MonoBehaviour
{
    [SerializeField] private bool gameIsPaused = false;
    [SerializeField] private GameObject pausePanel;
    [SerializeField] private Collect playerScript;
    [SerializeField] private TMP_Text scoreText;

    void Start()
    {

    }

    void Update()
    {
        scoreText.text = "Score: " + playerScript.mushroom.ToString();

        if (Input.GetKeyDown(KeyCode.Escape))
        {
            if (gameIsPaused)
            {
                Resume();
            }
            else
            {
                Pause();
            }
        }
    }

    public void Pause()
    {
        pausePanel.SetActive(true);
        Time.timeScale = 0f;
        gameIsPaused = true;
    }

    public void Resume()
    {
        pausePanel.SetActive(false);
        Time.timeScale = 1f;
        gameIsPaused = false;
    }
}
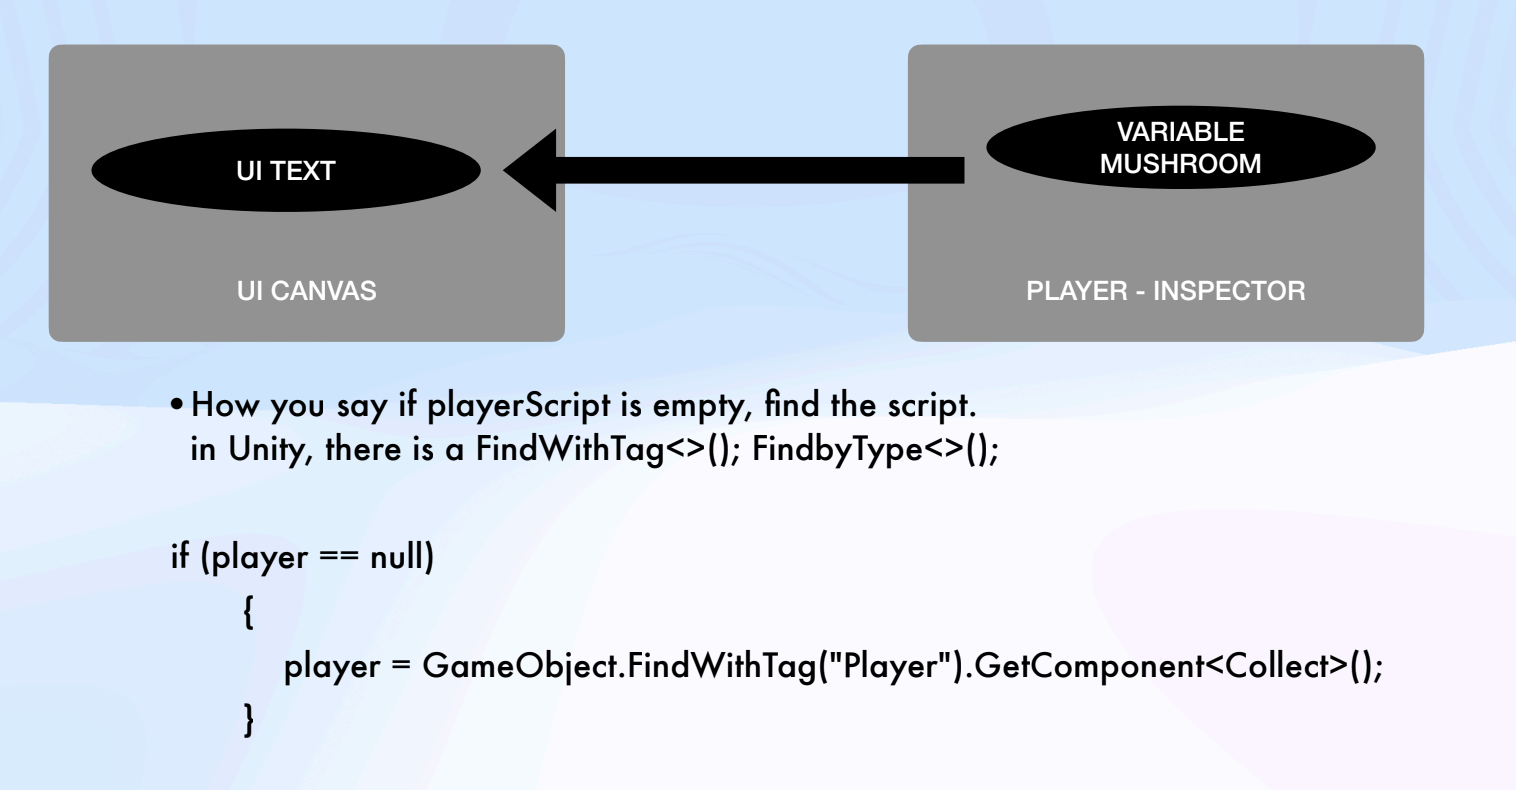
HUD Controller (Provided by Teacher on Google Drive)
using UnityEngine;
using TMPro;


public class HUDController : MonoBehaviour
{

    [SerializeField] private Collect player;
    [SerializeField] private TMP_Text ScoreText;

    // Start is called once before the first execution of Update after the MonoBehaviour is created
    void Start()
    {

        if (player == null)
        {
            player = FindObjectOfType<Collect>();
        }

        if (ScoreText == null)
        {
            ScoreText = GetComponentInChildren<TMP_Text>();
        }
    }

    // Update is called once per frame
    void Update()
    {
        if (player != null && ScoreText != null)
        {
            ScoreText.text = "Score: " + player.mushroom.ToString();
        }
    }
}
Font File
Extra Notes